Add Solution:
Install-SpSolution -Identity "VisualWebPartProject1.wsp" -WebApplication "URL" _GACDeployement
Feature Command
Install-SPFeature "C:\Program Files\Common Files\Microsoft Shared\Web Server Extensions\14\TEMPLATE\FEATURES\Feature name"
Uninstall-SPFeature "459FF807-10D1-41d4-ACA1-EDFC3BBFFB0B"
update-SPFeature "C:\Program Files\Common Files\Microsoft Shared\Web Server Extensions\14\TEMPLATE\FEATURES\BPCL Master Feature"
Backup command:
Backup-SPSite "http:///msd/AU" -path "E:\Backup\Backup\MSD\AU.bak" -Force -DatabaseServer SQL1\SPSQLLOCALSERVER -DatabaseName WSS_Content_MSD_AU
Tuesday, August 2, 2011
SilverlightWebParts


Using Visual Studio
You can create Silverlight-based applications using Visual Studio 2008. (Silverlight support for Visual Studio 2008 is available as a plug-in for the IDE.) Visual Studio provides the same tools for Silverlight, such as powerful editors, project management, debugging, and so on, that it already provides for creating applications with the .NET Framework.
Using Expression Blend
Designers can take advantage of the end-to-end capabilities of Microsoft Expression Blend to design, build, and deliver Silverlight-based applications. Expression Blend has all the capabilities needed to create graphics and media assets, design interactivity, and produce experiences. Expression Blend can generate XAML output, meaning that programmers who use Visual Studio and designers who use Expression Blend can share the same files.
Creating a Silverlight-based application with Microsoft Expression
Some of the resources in the following list provide information for both versions of Silverlight; other resources are specific to either 1.0 or 2. Note that the term "Silverlight" without a version number applies to both versions.
· Getting Started with Silverlight: Provides an introduction to developing applications with Silverlight 2.
· Silverlight Architecture: Provides an overview of the architecture of Silverlight.
· Silverlight 1.0 - Development with JavaScript: Provides information for developing with Silverlight 1.0, which supports the XAML markup language and JavaScript for creating applications. Most of the conceptual material contained in this section (animations, graphics, XAML, and so on) is also useful to Silverlight 2 developers.
· Silverlight 2 Beta 2 - Development with the .NET Framework: Provides information for developing with Silverlight 2, which includes .NET Framework features.
· Silverlight Technical Articles: Provides additional MSDN articles about Silverlight.
Introduction to Creating a Silverlight Web Part
This article describes how to create a very simple Microsoft Silverlight Web Part in ASP.NET that hosts a canvas (XAML), which can have events mapped to ECMAScript (JScript, JavaScript). We develop the Silverlight Web Part by using Microsoft Visual Studio 2005. The Silverlight Web Part uses Microsoft Silverlight only on the client side, and is based on the Microsoft Silverlight 1.0 Runtime. You can then use the Silverlight Web Part in Microsoft Office SharePoint Server 2007 and Windows SharePoint Services 3.0 to display a canvas (XAML).
Prerequisites
· To successfully create and use the Silverlight Web Part, you must understand the following: Microsoft Silverlight, XAML, ECMAScript (JScript or JavaScript code), and ASP.NET control development.
· To be able to test the solution, you must have the latest version of the Silverlight plug-in installed on the client computer.
To view the Page.xaml.js file and Default_html.js file referred to in this article, see Complete Page.xaml.js File and Default_html.js File.
Creating the Silverlight Web Part
The first part of our task is to create a solution in Visual Studio 2005, and then create the Silverlight Web Part.
To create the Silverlight Web Part
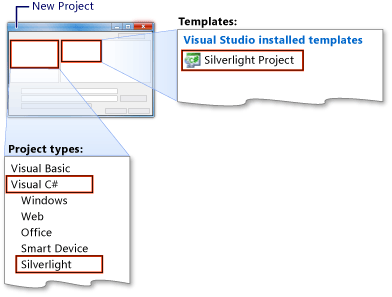
1. In Microsoft Visual Studio 2005, open a Visual C# Class Library project.
2. Remove Class1.cs.
3. Add the basic SilverlightWebpart.cs to the project.
4. In the project references, add a reference to System.Web.
5. Add private properties, which set the path to .js files and the .xaml file. You can add properties to customize the Silverlight Web Part to suit your specific needs.
6. Register the following three EcmaScript (JScript, JavaScript) files in the Web Part; these files are part of any standard Silverlight project or control:
· silverlight.js A standard file that detects whether the Silverlight client plug-in is installed on the client computer. If not, the file shows an icon of a location from where you can install the plug-in.
· Default_html.js The same as createsilverlight.js; this file contains the createSilverlight function that we need to modify with the code shown in code listing 7.
· Page.xaml.js Contains the event listeners.
7. Add the code that generates the HTML
tag where the Silverlight object will be created in your Web Part (for more information, see Creating Custom Web Parts).
8. Create a Default_html.js file and copy the following code into it to modify the createSilverlight function.
Deploying the Silverlight Web Part on Office SharePoint Server 2007
You can deploy the Silverlight Web Part on your server running Office SharePoint Server 2007 by using the following steps.
To deploy the Silverlight Web Part
1. Ensure latest version of the Silverlight plug-in is installed on the client computer. In the case that the plug-in is not installed, when the page with the Web Part loads for the first time, it displays a link that will show a location from which to download and install the plug-in. (This will happen automatically and no code is required.)
2. Copy the SomeName.dll (in our sample it will be SilverlightWebPart.dll) into the _app_bin directory of your SharePoint application; for example, C:\Inetpub\wwwroot\wss\VirtualDirectories\80\_app_bin. The .dll file can be signed and copied to the global assembly cache also.
3. Copy the files default_html.js, Page.xaml, Page.xaml.js and SilverLight.js into the top-level site (root) of the SharePoint Web application (for example, C:\Inetpub\wwwroot\wss\VirtualDirectories\80\_app_bin). We can copy these files at other locations also. Change the Silverlight Web Part property JSPath to the path where you have copied the .js files.
4. Add a element to the following entry to the web.config file with references to the SilverLight assembly, NameSpace, and mark it as safe.
5. For strong-named assemblies, the version, culture, and publickeytoken attributes will be added to the SafeControl element.
6. Go to the Web Part gallery from the site collection administration page. Click New, select BasicSilverLightWebPart, and then click populate gallery.
7. Go to any sample SharePoint site, and add the Silverlight Web Part to a page. Modify custom properties, such as the Silverlight control height and width.
8. Ensure that you supply the complete path to the Page.xaml file in the Silverlight Web Part’s custom properties (for example, /Page.xaml).
9. Save or publish the page.
Subscribe to:
Posts (Atom)